Honda CMe
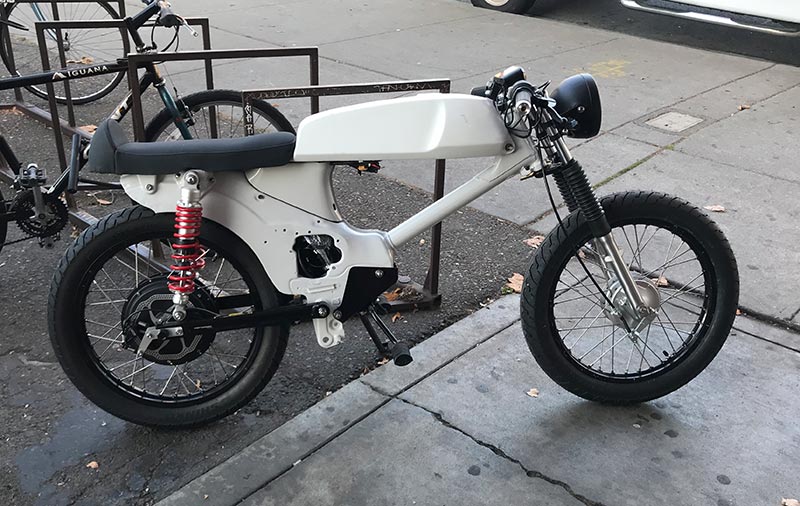
My 1967 Honda CM91 that I converted from gas to electric.
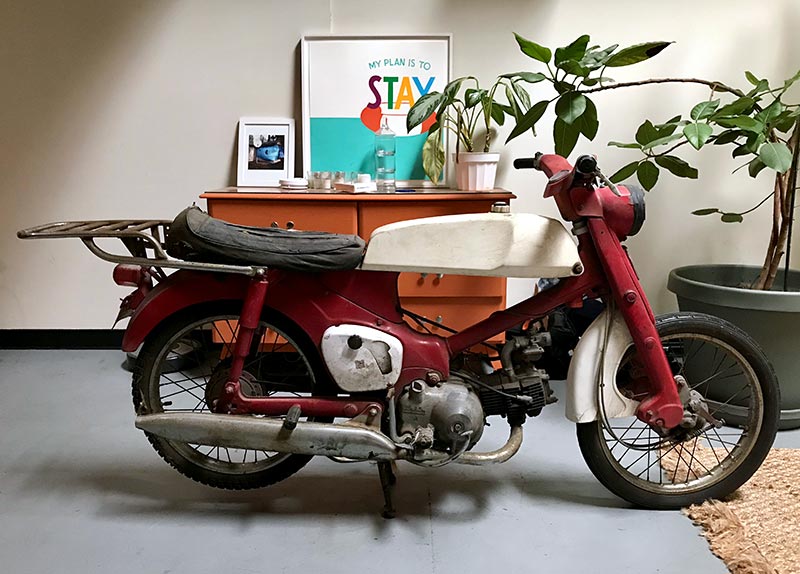
Before / After
For the last 5 years, I saw this Honda collecting dust in my friend Kingston's backyard. Each time I'd see it, I would ask him to sell it to me. I've built a few two-stroke mopeds over the years and was interested in building my first 'motorcycle'. Last year Kingston told me had to clear some stuff out of his space and asked me if I was interested in the bike. Needless to say, I was stoked. I wasn't familiar with the details of the bike before I got it and assumed the gas tank was something one of the past owners put on themselves. After a little research, I learned that the bike was a 1967 Honda CM91 with the one year only Rally pack; an attempt by Honda to make the bike more masculine than the usual step-through bikes they were selling with the same drivetrain. The Rally pack included a fiberglass tank with a plastic bladder and a seat with a similar style as ones I've seen on different Italian sportbikes of the era. At first, I was just planning on a standard restoration, keeping the original engine. But, after researching how others felt about the engine, the 3-speed transmission didn't sound very appealing to me, so instead of rebuilding this motor, I sold it and planned to find another engine that would fit. That all changed late one night while scanning the internet. I came across Shanghai Customs, some New Zealand expats living in China who put together an entire kit to electrify Honda Cubs, a bike similar enough to the CM91 that I thought I could make it work. I've had a slight interest in electric vehicles over the last few years and figured this would be a good way to learn. I ended up making the kit work with a little cutting and grinding and learned a lot about electric drivetrains in general. This post doesn't show every detail of the build process (should've taken more pictures), but should at least give an idea of what went into putting the CMe together.
Rolled it into the area under my stairs where I'll be working on it. Mostly to keep it out of the way in our downstairs living area.
Tank off, seat off, engine dropped, rear wheel removed.
Old swingarm removed.
The bike's original engine that had seen better days. It had compression and turned over, so was able to sell it on craigslist pretty easily.
I wasn't a big fan of the original front end, so switched it with another one using Trail 90 shock tubes and a CB100 triple tree. Everything fit and bolted up perfectly. Gotta love Honda parts compatability.
With the front end mocked up, I chopped the rear end in order to fit the larger tires I had in mind. Also, I just like the way it looks.
The controller case from Shanghai Custom was designed to fit a Honda Cub. It didn't quite line up with engine mount holes of a CM91.
Dremel grinder to the rescue.
After cutting away a little from the frame and drilling a new mounting hole, it now fits.
Front end removed and a quick mockup before sending parts off to be powdercoated.
A picture of the frame and other parts after picking them up from Leon's Powdercoating in East Oakland, a shop I've used on other vehicle projects over the years.
A closer shot of the powdercoating of the CB100 triple tree.
The inspiration for the bike's color scheme is my little Teenage Engineering OP1. Offwhite, with bright white, black, and color accents.
A shot of the inside of the original tank after I first took it off. At the time, I was hoping I could get a battery to easily fit inside without much modification.
Top view of the original tank.
The guys from Shanghai Customs helped me find someone who could make a battery with sufficient power output that would fit and I think they did an incredible job. The battery is 48v with 28ah and ended up fitting like a glove as you can see.
A side shot of the rear side of the tank that shows how close of a fitment it ended up being. This was the most expenisve single piece of the project, so super stoked that it ended up working out.
The shocks were designed to fit a Honda Cub which has a smaller size shock mount than the CM91. So, after drilling out the center bushing, they now fit the bike perfectly.
Mounted some sticky Shinko tires to the rear wheel. I've mounted quite a few motorcycle tires over the years, but never on a wheel with a heavy motor in it. No motorcycle shop would touch it, so after some struggle and cursing, the tire was mounted.
Shot of the same tire on the front wheel. A much easier install.
This piece to mount the rear disc brake was missing, so I got an autocad file from Shanghai Customs and had a local shop 3D print me a new one. Living in the future..
A shot of the rear wheel and the new swingarm mounted.
A shot of the electronic components that would be going in the compartment under the seat. Pictured is the DC convertor, an inline fuse, the power cable that connects to the battery, and the alarm, something the original bike definitely didn't have.
And in the compartment below is the relay box for the turn signals and brake lights goes.
Mounting the display with the CB100 triple tree was a tight fit, but it luckily worked out.
Hooking up controls and beginning to run all the wires. Eventually the wires would be run inside the tank to help keep them out of site. It was a very tight fit, but it worked out.
Picture of the seat back from upholstery at Genesis Upholstery in Walnut Creek who I've previously used on VW projets. Also in the shot are our 3 crazy dogs.
Shot of the virgin ride to my local bar, of course. Right now it's only hitting mid 20s, but the controller software will allow me to achieve a higher top speed in exchange for loss of some range (which I don't really need).
A view of the display that shows speed in km/h and how many watts I'm using. Also, a battery level indicator.
Fill her up. Plugged into the charger and getting juiced.
A rear shot that shows the tail light I'm using at the moment. It's a flexible rubber strip of leds that I found on Aliexpress for less than $10.
And another shot that shows some of the bike's current imperfections. Basically, the bike is now running, and running well, but I realized I need to take it apart again to grind the frame a bit to get the battery to sit more flush. You can see the power cable towards the rear of the tank. I would like to figure out a better way to conceal it, but I pretty much ran out of room in the frame. Hmm. Also, I'm still not sure how I'm going to add more style to the tank. The paint got a little nicked during assembly, so I'm thinking I might design a graphic to vinyl wrap on it or have an artist friend paint something funky. Stay tuned.